We went on a trip up to Tucson this weekend, and I took the opportunity to pick up some goodies. I grabbed a couple of electric airsoft guns and a couple thousand pellets from Wal-Mart, and an erector set from Target. The total set me back probably about $60 bucks, but it's in the name of science, right? That's what I told my wife.

I liked this gun because it was fully automatic, and I could see the parts from the outside, this would allow me to disassemble and reassemble it far more easily. After I got home from Walmarticus, it became immediately apparent that I would need to play with this toy a bit before I took it apart. It was also apparent that i would need to shoot someone in order to determine how bad it actually hurt (how bad the gun hurt). Much like when, as kids, I asked my brother to shoot me point blank with a slingshot to find out how much THAT would hurt.
I briefly contemplated shooting my 2 year old son, but obviously he would not be able to give me a good pain scale reaction, and I'd be needing something a little more accurate than just straight crying and screaming. I then considered shooting my wife, but I thought better of that, as I would probably end up paying for it in ways I didn't want to.
I'd have to shoot myself.
I sat down and aimed for the fleshy part of the calf where I thought it would hurt the least, and
found that it was indeed quite painful, painful enough to leave a welt. Yessssssss..
I would definately need to share this experience with someone soon.
I stowed the toy guns in the back trunk where nosy border inspectors would be unlikely to find them and we headed back home to Mexico.
When assembly time came, I first grabbed the parts from the erector set and assembled a platform. I attached the platform to a servo motor so it would move up and down, this would allow me to point the guns up at someone. Perhaps into a poorly protected, yet keenly sensitive area.


I attached the servo to my microcontroller and found that i could control the vertical movement quite nicely using the right thumbstick.

Next I used a screwdriver to carefully open the guns up and spray their spring loaded contents into my face. I followed this excellent tutorial at InventGeek which amazingly uses the same model airgun I picked up myself.
http://www.inventgeek.com/Projects/Airsoft_Turret_v2/overview.aspxI cut off the non-essential plastic areas where there was no gearing connected so as to leave only the firing mechanism and the barrel and the feed chamber attached.
Using the green diagonal brackets in the erector set as well as a dremel, I to cut holes and attached the remaining gun mechanism to the platform, being sure to leave the cool looking sights on for effect. Unfortunately Target doesn't sell laser pens anymore, and I forgot to pick one up at Wal-Marche, so I'll have to leave that off until I find one here in el campo. Which is maybe never


I hooked 'er up to the microcontroller directly for an initial test, and found that the servo could easily lift the weight of the guns, especially since the batteries were no longer part of the gun itself and would now be powered from the RC battery itself. So the next step will be to reassemble everything and see how it works, maybe shoot some pidgeons, maybe shoot my boss. Maybe 'accidentally' shoot my wife.

 I wanted to have my electronics next to the projector itself, so I could slide my DVD player and other stuff into the shelves.
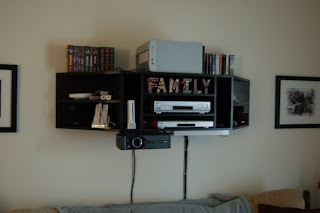 I also put a light underneath it for Vicki to do her cross-stitching without having to turn the overhead light on. You can also see that I put the subwoofer on top.
 So here's the finished product:
 It looks friggin awesome. I used wire anchors this time and routed the wires around the moulding so they wouldn't stick out or run across the floor.


 thing of beauty


 It was a pretty quick project, a little embedded light activated timer, but they wanted quick and cheap, and when we sent it of to get it quoted, the quote came back as $900 US dollars, but mine cost less than 300. Kind of a shame to use such a powerful board for such a dinky little project, it could do so much more, but maybe they'll ask for more next, who knows.


