Several of the pads are for unnecessary components, which is why they're not filled in.
Sunday, November 8, 2009
FreePoint SMT Video
I took a video of the surface mounting of a Freepoint Micro board. It's amazing how fast I work...
Sunday, August 2, 2009
Rocket Chute Deployment
I have a friend who does model rockets as a hobby. He was looking at getting an off-the-shelf deployment module for adding a parachute to his project. I mentioned that we could do it with an arduino and some sensors.
I had him check digikey.com for a cheap altimeter, and we found one for $7, but the lead time was too long. He's moving pretty soon, so we needed an immediate solution. I decided that we could use an accelerometer, and when it reads 0-Gs on the vertical axis, we'd know it was free-falling. (or had ended acceleration)
 Here's the underside of the board. I drew it up in EAGLE and etched it in the shop at work. You can see it's a little on the hablich side, needs a dose of alcohol and it could also use a small redesign. I noticed after I got the software running that a couple of the outputs were configured wrong in the hardware. If I ever make a V2.0, it'll be a little more attractive.
Hopefully we'll be able to test it out next week after I get back from Mexico.
I had him check digikey.com for a cheap altimeter, and we found one for $7, but the lead time was too long. He's moving pretty soon, so we needed an immediate solution. I decided that we could use an accelerometer, and when it reads 0-Gs on the vertical axis, we'd know it was free-falling. (or had ended acceleration)

We set up a timer that would deploy the parachute a given time after the acceleration ends.
The red and blue wires arm the device. These get twisted together after you get the rocket set up. so it won't go off unexpectedly. The device also monitors the nichrome ignition wires. If one of the wires gets broken, you can tell from the LED indicators on the bottom.
Here's the underside of the board. I drew it up in EAGLE and etched it in the shop at work. You can see it's a little on the hablich side, needs a dose of alcohol and it could also use a small redesign. I noticed after I got the software running that a couple of the outputs were configured wrong in the hardware. If I ever make a V2.0, it'll be a little more attractive.Hopefully we'll be able to test it out next week after I get back from Mexico.
Friday, May 29, 2009
Agitation
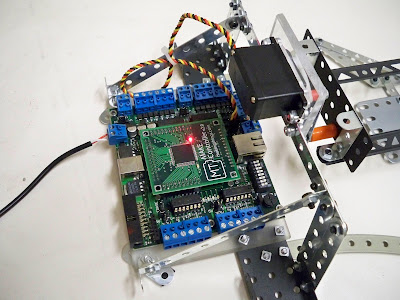
I've been etching numerous PCBs at work for various little projects, and one of the annoying parts of etching is the actual etch process. The copper clad board is immersed in Ferrocloric acid in order to etch away the exposed portions of the board. During the etch, the liquid should be agitated in order to achieve maximum saturation. I got tired of jiggling the tupperware around for 20 minutes, so I built an agitator!

You can see that this project uses the make controller as well as an erector set. I used a HiTec 645MG servo for the agitation.
Here's the video. Rated PG-13 for intense battle sequences and some scary images:
I didn't have anything to etch at the moment, so the video shows the tub with Mountain Dew in it instead. Maybe that would be good for etching designs in teeth...
As you can see, the servo oscillates above and below the horizontal. This ensures that the acid flows both ways.
I made a circuit board for a device we're calling FreePoint. This is the prototype design that's made to plug in as an arduino shield. The final version will be standalone.


Monday, January 26, 2009
Dr. Claw First Run
Well, I got the claw hooked up to my software. Here's the video. I also uploaded it onto youtube, where the quality really sucks, btw.
Now I've got to write some extra-custom software that will allow me to navigate to coordinates and manipulate objects. I also plan to integrate the Wii remote after that using the C# library. Shouldn't be too tough.
You'll notice that the shoulder joint isn't running yet. I'll be adding a geared stepper motor to the base (which already has the gears integrated as shown in a previous blog). I'll also need to make the shoulder a bit sturdier and add a servo reverser before that joint works.
The music is a new song I'm working on with Fuzil.
Saturday, January 24, 2009
Dr. Claw: Hand of Destruction
I wanted to build something really cool using purely Meccano/Erector components. It's tough to integrate electronics with Meccano, but i wanted to get something robotic. I wanted to make sure also that it was only Meccano. I also wanted it to look really good. Not just stuck together with bubble gum and duct tape. So here's what you get:
 ... I mean even better looking than this...
So here's what I made:

It's a robotic arm. I modeled it off an industrial robotic arm with 5 degrees of motion. It has base rotation, shoulder, elbow, and wrist rotate as well as wrist tilt. Also has a sweet lookin' claw attached to the end.
Here's a shot of the claw in full vertical extension. You can see that I'm using dual servos at each joint. This will allow me to have plenty of strength to move the (heavy) metal Meccano pieces as well as whatever's in the claw at the time.


Build Details:
The above picture is the rotational base. It is purely Meccano, and rotates quite well. I set it up so that I'll be able to drive it with a stepper motor later on via the gear on the left. The stepper will allow me to drive it to a specific angle for precise movement. I really had to put on my thinking cap to come up with the design above.
Here's the stepper I'll be using:
 In order to actuate the arm, I had to attach the servo horns somehow. I made servo links from some steel wire i picked up at ACE. Holy crap that stuff was hard to bend. And I wore out a pair of Diagonal Cutters too. My hand is going to be sore tomorrow.
 Getting the wire to couple with the erector set was a challenge too. but i found a way to wrap the wire into some stock meccano "ring terminals." I had to crimp the terminals down and wrap the wire around the post for stability, but it turned out great. I also used some hefty HS-645MG metal gear servos from Hi-Tec. These servos have phenomenal torque.

Probably the most difficult part in designing the arm was figuring out how I'd get the wrist to actuate. The shoulder and elbow were tough, but nothing comparted to the wrist. I must have built 10 different claw configurations, and each one wouldn't work for a different reason. Some weren't stable enough, some couldn't hook up to the servos, some were too heavy, too weak, etc. Finally I came up with the design you see here. I think it's perfect, and it balances well with the rear end of the wrist.

You can see that I used the stock Meccano rubber pads for gripping on the claw.
 It's important when working with hobby servos, not to stress the servo horn radially. This can damage the axle of the servo, particularly with the wimpy HS-325HB servos I would be using at the wrist. These servos have "karbonite" inner gears. These gears are tougher than plastic, but don't have the durablilty to withstand much abuse. They're kind of like a nylon material. I decided I'd mount the wrist tilt using dual servos facing inward toward the wrist. This would ensure that there was only a low radial load.
 Adding the wrist rotation was even more difficult. I wanted to get at least 520 degrees of rotation for manipulating small objects, but servos only have about 190 degrees at most. I used some stock Meccano gearing and built a servo bracket to mount a drive gear vertically: The smaller gear at the bottom is on a shaft that the claw is bracketed to, making the shaft and claw rotate perfectly. (Sounds easy when it's right in front of you, but this took days to figure out)

 Below a shot of the pinchers i tried to use. (Grabber attempt #7). I used Shapelock, which is a great product for prototyping. Unfortunately they turned out to be too flexible for my liking. Plus they went against my goal of a pure meccano build.
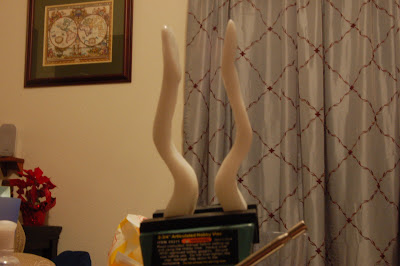 Shapelock is a low temperature thermoplastic that can be reheated and reshaped endlessly. It's like modeling clay, but better! Given the correct thickness, they would have been less flexible, but I didn't want to worry about the weight etc.
  I also built an external power supply for driving all these crazy servos. The next step will be to hook this sucker up to my make controller and write the software to control it. Fortunately, thought, i think that will be the easy part. I'll try to take some videos during testing.
 ... I mean even better looking than this...
So here's what I made:
It's a robotic arm. I modeled it off an industrial robotic arm with 5 degrees of motion. It has base rotation, shoulder, elbow, and wrist rotate as well as wrist tilt. Also has a sweet lookin' claw attached to the end.
Here's a shot of the claw in full vertical extension. You can see that I'm using dual servos at each joint. This will allow me to have plenty of strength to move the (heavy) metal Meccano pieces as well as whatever's in the claw at the time.
Here's a horizontal extension:
Build Details:
The above picture is the rotational base. It is purely Meccano, and rotates quite well. I set it up so that I'll be able to drive it with a stepper motor later on via the gear on the left. The stepper will allow me to drive it to a specific angle for precise movement. I really had to put on my thinking cap to come up with the design above.
Here's the stepper I'll be using:
In order to actuate the arm, I had to attach the servo horns somehow. I made servo links from some steel wire i picked up at ACE. Holy crap that stuff was hard to bend. And I wore out a pair of Diagonal Cutters too. My hand is going to be sore tomorrow.Getting the wire to couple with the erector set was a challenge too. but i found a way to wrap the wire into some stock meccano "ring terminals." I had to crimp the terminals down and wrap the wire around the post for stability, but it turned out great. I also used some hefty HS-645MG metal gear servos from Hi-Tec. These servos have phenomenal torque.Probably the most difficult part in designing the arm was figuring out how I'd get the wrist to actuate. The shoulder and elbow were tough, but nothing comparted to the wrist. I must have built 10 different claw configurations, and each one wouldn't work for a different reason. Some weren't stable enough, some couldn't hook up to the servos, some were too heavy, too weak, etc. Finally I came up with the design you see here. I think it's perfect, and it balances well with the rear end of the wrist.
You can see that I used the stock Meccano rubber pads for gripping on the claw.
It's important when working with hobby servos, not to stress the servo horn radially. This can damage the axle of the servo, particularly with the wimpy HS-325HB servos I would be using at the wrist. These servos have "karbonite" inner gears. These gears are tougher than plastic, but don't have the durablilty to withstand much abuse. They're kind of like a nylon material. I decided I'd mount the wrist tilt using dual servos facing inward toward the wrist. This would ensure that there was only a low radial load. Adding the wrist rotation was even more difficult. I wanted to get at least 520 degrees of rotation for manipulating small objects, but servos only have about 190 degrees at most. I used some stock Meccano gearing and built a servo bracket to mount a drive gear vertically: The smaller gear at the bottom is on a shaft that the claw is bracketed to, making the shaft and claw rotate perfectly. (Sounds easy when it's right in front of you, but this took days to figure out)Below a shot of the pinchers i tried to use. (Grabber attempt #7). I used Shapelock, which is a great product for prototyping. Unfortunately they turned out to be too flexible for my liking. Plus they went against my goal of a pure meccano build.
 Shapelock is a low temperature thermoplastic that can be reheated and reshaped endlessly. It's like modeling clay, but better! Given the correct thickness, they would have been less flexible, but I didn't want to worry about the weight etc.
I stayed pretty true to my goal of using only erector set components, in fact, the only non-meccano parts in my build were:
Linkage Rods.
Servos
Home-made Servo Brackets
6 brass collars
Plexiglass Base (seen in indoor shots above)
make controller
So there it is: DR CLAW. A pure meccano build that's sturdy, functional, and fairly attractive.
Feast your eyes.
 I also built an external power supply for driving all these crazy servos. The next step will be to hook this sucker up to my make controller and write the software to control it. Fortunately, thought, i think that will be the easy part. I'll try to take some videos during testing.
Sunday, January 18, 2009
Electronics and Meccano (Erector)
Since the dawn of time, mankind has been searching. Searching for the answer to a question that has plaigued us all these years. The burning question that has tormented us since before history will now be answered. The time for answers has come.
How do i get my electronics junk to fit with my erector set???
I've had a love affair with the worlf of Meccano(Erector) for several years now, but the festering issue that has plaigued our relationship is the fact that NO electronics items are designed to jive with the 1/2" hole spacing scheme that meccano is known for.
For rapid prototyping, Meccano just can't be beat. You can build virtually anything with all the little premade mechanical parts, brackets, gears, and hardware included in the sets. I love building the models that come with the kits, but it is always more satisfying to build something yourself. From scratch. And why would you build anything unless it moved on its own. This necessitates servos, sensors, microcontrollers, motors etc. The problem is that none of these devices is hole-compatible with Meccano. The other problem is that there are relatively few places where you can find brackets for these devices, and NOBODY makes these brackets for Meccano. After scouring the internet for solutions, I decided to take matters into my own hands.
The biggest culprit in the war for hole-compatibility is the dreaded servomechanism. Hobby servos are designed with an unusual spacing that makes them practically unusable with your meccano set. Therefore I decided that I would make my own using plexiglass and my router.
(I also have a relationship with that particular tool.) You can see the results below

By creating my own bracket, i was able to get perfect hole compatibility with the servo, and thereby mount it on my project.

Next step: Arduino and Make Controller.
Most microcontroller kits have exposed circuitry on the bottom, which can be risky. So the microcontroller bracket serves a dual purpose. First providing necessary shielding from touching metal, and second, providing slick mounting holes.

 Arduino and Lithium Backpack from http://www.liquidware.com/.
Now to try out the Servos on this beast:

You can see that by using a combination of bracketry and meccano spacers, i've got a sweet little setup here. The servos fit in perfectly and leave the drive arms exposed at just the right position.

But just what is this that I'm attaching the servos to?
Stay tuned.
Subscribe to:
Posts (Atom)