This is a component of the Harness Roller which was designed using C# and make controller for interfacing.

Wednesday, December 10, 2008
Optical Interruptor
Heres an example of how to make an optical interruptor for detecting position. This example uses a simple superbright LED and a light sensor. A black flag passes between these and the light change is detected by the microcontroller.
Monday, November 10, 2008
Disruptor Donor
So for all of you who know about the bike project, here's the donor bike. I'm totally stoked.
We got a restored 1977 Harley Shovelhead lowrider.
I am stoked!!!


We got a restored 1977 Harley Shovelhead lowrider.
I am stoked!!!


Sunday, October 26, 2008
Finalized RC Car Photos
Well, here it is, I've got everything assembled and thought I'd throw up some photos of the finished product!


I have to make some adjustments to the guns still, but outside of that, it's all done. I'd still like to add a camera and laser, but the camera is a bit expensive, so I think the project will be shelved for awhile until some extra cash falls from the sky.
Sunday, September 14, 2008
EV Rally


I wen't to the Electric Vehicle rally in Palo Alto, CA. I had a good time and got some important questions answered. Here are some photos:
Tuesday, September 2, 2008
Portal
So I just beat Portal for the first time. I have to say that all the hype was well deserved. This is the best game i've played since mario galaxy. I just wish it could have been a bit longer...
I think the best part of the game was the constant commentary/narration from the robot.
Great game, pick it up.
I think the best part of the game was the constant commentary/narration from the robot.
Great game, pick it up.
Wednesday, August 20, 2008
Music Updates
Made some updates to some of my tunes a few days ago, also added some new ones. I put the dates next to them.
My friend Jorge did the guitars on most of these songs. He plays drums for FUZIL.
Their band site is at:
http://www.myspace.com/fuzilguaymas
My friend Jorge did the guitars on most of these songs. He plays drums for FUZIL.
Their band site is at:
http://www.myspace.com/fuzilguaymas
Wednesday, August 13, 2008
Music!
I added a music player to the blog!
These songs are still in progress, but I've put a lot of work into them, so tell me what you think.
You can listen to them at the right by pushing the play button. They come up in a floating media player.
Enjoy!
Friday, August 1, 2008
Wii Custom Sensor Bar
I have a little larger room now and was noticing that the Wii remotes werent really responding well on the sides. I decided I needed a higher powered sensor bar.

 Here's the simple schematic. I used a 5V wall adapter, but soon I'll be hooking it up so it will turn on wirelessly with the Wii. That step is pretty low on the priority list right now, though.


The sensor bar has IR LEDs inside of it. The wii knows the pointer location and roll by tracking these two LED points with an IR filtered camera inside the wii-remote.
Normal LEDs have a viewing angle of about 45 degress, meaing you can be right in front of them or up to 23 degress to the direct left or right. Outside of that range, the wii pointer will start to glitch. This is what I wanted to get rid of. I also wanted higher power so I could stand farther away. So the normal viewing angle is like this
And I wanted a wider viewing angle like this
So I decided to build my new sensor bar with multiple LEDs on each side, pointing out in different directions, thereby expanding the viewing angle of the wii remote camera.Here's the simple schematic. I used a 5V wall adapter, but soon I'll be hooking it up so it will turn on wirelessly with the Wii. That step is pretty low on the priority list right now, though. I used some little hobby PLCs from Radio Shack and colored them black with a marker. Then I used 2 sided mounting tape to attach them to the projector screen case. I wanted them at the top of the screen because I've noticed I get wrist cramps with them at the bottom.
I left the LEDs sticking out about 1/2" from the board, this way I could point them around to find the optimized angles for all the play positions in the room.
Finished Product!

New Home Theater Shelf
So my friend Josh is a carpentry genius. He used to have a business doing cabinetry so I talked him into building an entertainment shelf for my home theater. I drew it up in google SketchUp. This is what I wanted:
 I wanted to have my electronics next to the projector itself, so I could slide my DVD player and other stuff into the shelves.
He brought it by last night, and Here's how it looks all hooked up.
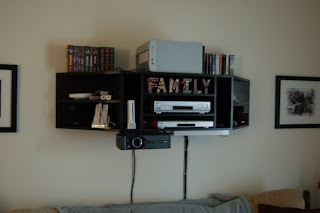 I also put a light underneath it for Vicki to do her cross-stitching without having to turn the overhead light on. You can also see that I put the subwoofer on top.
 So here's the finished product:
 It looks friggin awesome. I used wire anchors this time and routed the wires around the moulding so they wouldn't stick out or run across the floor.
This time I didn't actually have that many wires to route across the floor though, because now that the projector is next to the electronics, only the front 3 speakers needed longer wiring.
In fact, Josh made little shelves for the speakers as well. He even made a new shelf for my center speaker.
Wednesday, June 11, 2008
Tape Timer
As I mentioned before, we built a special harness assembly board to teach new operators how to apply spiral tape to a harness. We wanted to be able to time them as well so we could see improvement etc.
They wanted a timer that would be activated when the operator picks up the tape, and deactivated when the operator puts it back.
So I used a make controller, and a sparkfun LCD screen to do the job. I built some firmware that would do the timing. I connected a light sensor so that when light was detected in the holder, the timer would start, and then stop when it went dark. See it in action below!
Wednesday, June 4, 2008
Live Floor
So recently I had an idea about monitoring production in our plant using Xbee modules to collect data from the assembly boards. For example, i wanted to be able to know if an operator was at their station at any given time, also how long it takes to build each harness, total downtime of the board, how many pieces built, etc.  thing of beauty


So my changito and I designed and built some Xbee boards. We used the xbee board from makingthings as a jumping off point, and then drew up some plans for what you see here:
thing of beautyThen we added the Xbee module
Here is the make controller with the receiver Xbee in place, I may look into another option for receiving the packets, possibly one of the USB xbee adapters from Sparkfun, but for now, this works.
Anywho. We then mounted it onto a prototype Assembly board that we built. 
It has the 2 holders for the harness connectors. So the way it works is that when the operator is there, the movement is picked up and also as each piece is approved, a message is sent back to the receiver that talks to the PC and database.
I wrote some software that would juggle the information around a bit and keep track of things. I'll write some more about that next time.
Spoiler Alert! Barbie makes a special guest appearance...
Tape Timer
We're working on an assembly board for training operators on how to assemble harnesses. They wanted me to build a cheap timer that would output the time that a roll of tape spent away from its dock. In other words, time how long it took for the operator to use the tape. So i took some time and built this dock with an integrated sensor and indicator LED. I hooked er up to a make controller and set up the serial port to send out the time.
 You can see the indicator LED goes on when the tape is removed
 Right now I've got a serial cable running out from the controller that goes to the computer (which shows the time). Next week I'll be getting a little LCD screen that will show the time.
 Here is the serial signal coming out of hyperterminal:

So, next i'll add this little gem here, when i get it, and we'll be rolling:
 It was a pretty quick project, a little embedded light activated timer, but they wanted quick and cheap, and when we sent it of to get it quoted, the quote came back as $900 US dollars, but mine cost less than 300. Kind of a shame to use such a powerful board for such a dinky little project, it could do so much more, but maybe they'll ask for more next, who knows.
Monday, May 19, 2008
AirSoft Turrets
We went on a trip up to Tucson this weekend, and I took the opportunity to pick up some goodies. I grabbed a couple of electric airsoft guns and a couple thousand pellets from Wal-Mart, and an erector set from Target. The total set me back probably about $60 bucks, but it's in the name of science, right? That's what I told my wife.
I liked this gun because it was fully automatic, and I could see the parts from the outside, this would allow me to disassemble and reassemble it far more easily. After I got home from Walmarticus, it became immediately apparent that I would need to play with this toy a bit before I took it apart. It was also apparent that i would need to shoot someone in order to determine how bad it actually hurt (how bad the gun hurt). Much like when, as kids, I asked my brother to shoot me point blank with a slingshot to find out how much THAT would hurt.
I briefly contemplated shooting my 2 year old son, but obviously he would not be able to give me a good pain scale reaction, and I'd be needing something a little more accurate than just straight crying and screaming. I then considered shooting my wife, but I thought better of that, as I would probably end up paying for it in ways I didn't want to.
I'd have to shoot myself.
I sat down and aimed for the fleshy part of the calf where I thought it would hurt the least, and
found that it was indeed quite painful, painful enough to leave a welt. Yessssssss..
I would definately need to share this experience with someone soon.
I stowed the toy guns in the back trunk where nosy border inspectors would be unlikely to find them and we headed back home to Mexico.
When assembly time came, I first grabbed the parts from the erector set and assembled a platform. I attached the platform to a servo motor so it would move up and down, this would allow me to point the guns up at someone. Perhaps into a poorly protected, yet keenly sensitive area.
 I attached the servo to my microcontroller and found that i could control the vertical movement quite nicely using the right thumbstick.
 Next I used a screwdriver to carefully open the guns up and spray their spring loaded contents into my face. I followed this excellent tutorial at InventGeek which amazingly uses the same model airgun I picked up myself.
http://www.inventgeek.com/Projects/Airsoft_Turret_v2/overview.aspx
I cut off the non-essential plastic areas where there was no gearing connected so as to leave only the firing mechanism and the barrel and the feed chamber attached.
I liked this gun because it was fully automatic, and I could see the parts from the outside, this would allow me to disassemble and reassemble it far more easily. After I got home from Walmarticus, it became immediately apparent that I would need to play with this toy a bit before I took it apart. It was also apparent that i would need to shoot someone in order to determine how bad it actually hurt (how bad the gun hurt). Much like when, as kids, I asked my brother to shoot me point blank with a slingshot to find out how much THAT would hurt.
I briefly contemplated shooting my 2 year old son, but obviously he would not be able to give me a good pain scale reaction, and I'd be needing something a little more accurate than just straight crying and screaming. I then considered shooting my wife, but I thought better of that, as I would probably end up paying for it in ways I didn't want to.
I'd have to shoot myself.
I sat down and aimed for the fleshy part of the calf where I thought it would hurt the least, and
found that it was indeed quite painful, painful enough to leave a welt. Yessssssss..
I would definately need to share this experience with someone soon.
I stowed the toy guns in the back trunk where nosy border inspectors would be unlikely to find them and we headed back home to Mexico.
When assembly time came, I first grabbed the parts from the erector set and assembled a platform. I attached the platform to a servo motor so it would move up and down, this would allow me to point the guns up at someone. Perhaps into a poorly protected, yet keenly sensitive area.

 I attached the servo to my microcontroller and found that i could control the vertical movement quite nicely using the right thumbstick.
 Next I used a screwdriver to carefully open the guns up and spray their spring loaded contents into my face. I followed this excellent tutorial at InventGeek which amazingly uses the same model airgun I picked up myself.
http://www.inventgeek.com/Projects/Airsoft_Turret_v2/overview.aspx
I cut off the non-essential plastic areas where there was no gearing connected so as to leave only the firing mechanism and the barrel and the feed chamber attached.
Using the green diagonal brackets in the erector set as well as a dremel, I to cut holes and attached the remaining gun mechanism to the platform, being sure to leave the cool looking sights on for effect. Unfortunately Target doesn't sell laser pens anymore, and I forgot to pick one up at Wal-Marche, so I'll have to leave that off until I find one here in el campo. Which is maybe never

 I hooked 'er up to the microcontroller directly for an initial test, and found that the servo could easily lift the weight of the guns, especially since the batteries were no longer part of the gun itself and would now be powered from the RC battery itself. So the next step will be to reassemble everything and see how it works, maybe shoot some pidgeons, maybe shoot my boss. Maybe 'accidentally' shoot my wife.


 I hooked 'er up to the microcontroller directly for an initial test, and found that the servo could easily lift the weight of the guns, especially since the batteries were no longer part of the gun itself and would now be powered from the RC battery itself. So the next step will be to reassemble everything and see how it works, maybe shoot some pidgeons, maybe shoot my boss. Maybe 'accidentally' shoot my wife.
Saturday, April 26, 2008
Tuesday, April 22, 2008
Saturday, April 19, 2008
Happy Microcontroller Birthday!
This year for my birthday I asked for a make controller to carry out my dastardly little science experiments with.


A microcontroller is basically a tiny computer that you hook up to motors and sensors and stuff.
Anyway, this microcontroller can be fit with wireless modules called Xbees. That means you can hook sensors, switches, buttons, etcetera up to the wireless module, and have your movements get sent back to the controller so it takes action.
I decided that my first project would be hooking up my new microcontroller up to my RC car. That would allow me to get... not only normal car movements... but also I could hook up some James Bond type gadgets to the car and control them too.
I started off by "repurposing" an old USB wavebird joypad for my PC. I opened it up and tapped into all the button and control stick signals and fed them in to the Xbee module as shown below


So now all of my button presses get sent back to the microcontroller which is mounted on the car. The sweet thing about the Xbees is that they have a 1 mile range. So I can control the car from way far away. 


The next step was to attach the microcontroller to the car and then program it. I had to write a program in C++ that would tell the car what to do for each button I pressed, whether it is to listen to a sensor, make the wheels go, turn lights on, etc. The program is basically the most important part, because it determines how your car will act, if it will be autonomous, or respond to user stimulus, etc.

So I have one Xbee hooked up to my new joypad, and also one hooked onto the microcontroller on the car, so the car will hear what my joypad is doing and take action.
I hooked up the steering and drive wheels to the servo outputs on the microcontroller (above right).
I then made some headlights out of superbright LEDs and mounted them like fog lights. I also decided that any self-respecting RC car needed a horn so that you could annoy people. Naturally I would have to add one.

So then I wrote my program up and after a few attempts, got the car to start responding. So now I've got to decide what else I'll put on the car. I think i'll put a little light sensor on and maybe some running lights that will turn on when it gets dark.
I'll probably also make a little airsoft cannon that i can aim with servos and hook that up too.
A wireless camera might be a nice addition.
A wireless camera might be a nice addition.
Any other ideas?
I guess that engineering degree was good for something after all..
Sunday, April 13, 2008
Assistant
So i guess i didn't make it clear that this new assistant is NOT the original assistant I had. The first one was a spaz, and this guy is actually quite good.
Friday, April 4, 2008

Subscribe to:
Posts (Atom)